

FirstOne Applet Tutorial
![]()
FirstOne Applet Tutorial
Hi!
This is a simple "hands-on" java introduction based on the FirstOne demo applet.
1.Concepts
First some concepts about Object Oriented Modelling:
Abstraction: focus on essential. For example: one should care about what kind of services an object should provide but not on how to implement them. In our implementation we do not have to implement a real debugger, just make a system that "looks" like one.
Encapsulation: don't mix internal and external aspects of an object. After the border is defined its easier to analyse each part separately. In the FirstOne example the implementation of each object is independent of the others.
Sharing: between classes without repeating code, using same objects in several applications. In out example we use sub-classes of Applet, Container, Component, etc, etc.
Focus on object structure, not procedural structure: care about object behaviour and interconnections and not how to implement them. This one is used more on Modelling than in Implementing but is here for completeness of this list.
Association: conceptual connection between two classes. (idem).
Link: conceptual connection between two objects (i.e. Association instance)
And some concepts about Object Oriented Languages:
Object: the integration in one single entity of behaviour and data
Identity: data is divided in uniquely identified identities called objects. An object can be some real world object (like "machine") or some concept (like "marketing management"). Any two objects are distinguishable even if they share the same methods and fields.
Classification: objects with the same data structure (attributes) and behaviour (operations) are grouped in classes. Each object is an instance of a class.
Polymorphism, operations, methods: polymorphism lets one operation have different behaviours in different classes. On operation is an action or transformation an object executes or is affected by. A method is on specific implementation of an operation.
Heritage: sharing of characteristics between classes based on hierarchical relations. Each sub-class incorporates all properties of its (in Java one class can have only on super-class, but in other OO languages on class can have multiple super-classes) super-class and adds its own properties.
Signature: number, order and type of arguments of a method
2.Java Basics
Java Virtual Machine: The support structure to execution of Java Bytecode that enables the execution of the same Java ByteCode in different platforms
The basic execution models of Java are represented in this image:
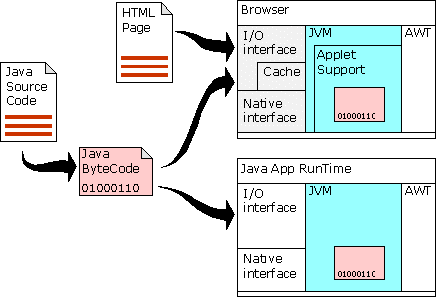
Fist we have the Java Source Code that is compiled into Java ByteCode using an Java Compiler like the one included in JDK or Visual J++.
Then we have two different execution environments: Applets and Applications.
In an Application, the Java App RunTime gives full access to the Java code to all resources in the computer. We only need to provide the ByteCode for our classes. To start an application we give the main class name to the Java App RunTime, this class must have the method "public static void main(String args[])".
In an Applet, the JVM is executed inside a browser (or the AppletViewer in JDK) and the applet has controlled access to resources. The applet and parameters are defined in an HTML document (one can have several applets in the same HTML page).
3.The Applet
Press Start/Next button to execute next line. The yellow triangle signals the current line.
Click on the dark gray bar to toggle the visual representation of breakpoints. Is this version breakpoints do nothing.
The var window shows the status of variables a (Var 1), b (Var 2) and c (Var 3). The last one written to is signaled in red.
4.The X-Ray
5.The documented source code
//Java has the concept of package that is a group of related classes we use the import statement to get access to packages
import java.util.*;
import java.awt.*;
import java.applet.Applet;
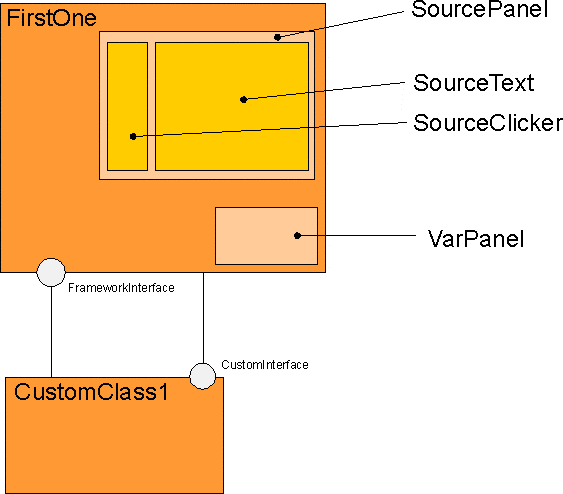
//FirstOne is our main Applet class
//extends Applet means that is a sub-class of Applet like every Applet. The browser only knows how to use Applet objects, by subclassing the Applet class we let the browser use our class implementing new behaviour to the standard Applet (that does nothing).
//implements FrameworkInterface means that we will define in this class all the methods defined in the FrameworkInterface (see below). In this way one class can use our class like a FrameworkInterface and be sure that the methods that are defined in it are available.
public class FirstOne extends Applet implements FrameworkInterface {
//Object variables declaration an initialization... The new keyword is used to create new objects of a class.
    //Button is an standard graphical user interface (GUI) push button
    Button b1 = new Button("Start");
    //SourcePanel,VarPanel are our classes for the GUI
    SourcePanel sp1 = new SourcePanel();
    VarPanel vp1 = new VarPanel();
    //We use our CustomInterface to comunicate with the custom classes.
    //We can assign any class that implements CustomInterface to variable cc1.
    //In this case we use our CustomClass1.
    CustomInterface cc1 = new CustomClass1();
//this method is defined in the Applet super-class and its called by the browser to initialize the applet.
public void init() {
    //Layout manager are used to manage the space in the visible area of the applet.
    //In our applet we will do it in an pixel by pixel basis so we don't use Layout Manager.
    setLayout(null);
    //The add method is inherited by Applet from its super-class Container.
    //We use it to put Components (GUI objects) in the GUI.
    add(sp1);
    add(b1);
    add(vp1);
    //Now we must define the position and size of our Components
    sp1.reshape(10,10,180,100);
    b1.reshape(10,110,180,20);
    vp1.reshape(10,140,100,50);
    //Finaly we use the setParent method defined in the CustomInterface to comunicate with CustomClass1 and give a reference to ourself
    cc1.setParent(this);
}
//this method is defined in the Applet super-class and its called by the browser to signal button presses and other specific events.
public boolean action(Event evt, Object what) {
    //First we verify if it was b1 the target of the event
    if (evt.target==b1) {

        //We disable it (it turns gray in the GUI)
        b1.disable();
        //sp1 keeps track of the current line in the source text area.
        //first we retrive the current line using sp1.getLine
        //then we call cc1.executeLine to execute the operations of that line
        //the returned value is the next line in the code that is passed back to sp1
        sp1.setLine(cc1.executeLine(sp1.getLine()));
        //we use -1 line number to set the end of execution
        if (sp1.getLine()==-1)
            //Change the text in the button to "Start"
            b1.setLabel("Start");
else
            //Change the text in the button to "Next"
            b1.setLabel("Next");
        //Now that we have executed the line we can enable the button again
        b1.enable();
        //when we process an event we sould return true to the applet
        return true;
}
     //other events will be processed by the Applet action implementation
     return super.action(evt,what);
}
//This methods are defined in the FrameworkInterface (see bellow) we just forward them to vp1 and sp1
public void changeVar(int varId, int newValue) {
    vp1.changeVar(varId, newValue);
}
public int getVar(int varId) {
    return vp1.getVar(varId);
}
public void setText(String[] lines) {
    sp1.setText(lines);
}
} //class FirstOne
//SourcePanel is used to group the clicable area of SourceClicker and the text area of SourceText.
//All relevant events are forwarded to this classes
//extends Panel means that we will use the default implementation of an Container.
//A Container is a sub-class of Component that can have multiple Components added to it.
class SourcePanel extends Panel {
SourceClicker sc1 = new SourceClicker();
SourceText st1 = new SourceText();
    //This is a constructor (note that it has the same name of the class), it is used only to initialize objects of this class.
    public SourcePanel() {
         //Position st1 and sc1 in our GUI area
         setLayout(new BorderLayout());
         add("Center", st1);
         add("West", sc1);
    }
    //The following methods are forwarded to sc1 and st1
    public int getLine() {
         return sc1.getLine();
    }
    public void setLine(int line) {
         sc1.setLine(line);
    }
    public void setText(String[] lines) {
        st1.setText(lines);
    }
} //class SorcePanel
//SourceClicker is an clicable area where we can enable or disable the graphical representation of breakpoints (red circles).
//it also signals the current line using an yellow triagle.
//extends Canvas means that we will use the default implementation of an Component.
//We don't use Panel because we don't have to add any components to this one.
class SourceClicker extends Canvas {
    //br[] is an array of 10 booleans used to store the breakpoint status of each line (max 10!)
    boolean br[]=new boolean[10];
    //cur_line is our (internal) line indicator
    int cur_line = -1;
    //the constructor just defines our background color
    public SourceClicker() {
        setBackground(Color.gray);
    }
    //the method paint is called automatically when the GUI needs to repaint the area of an Component.
    //we just draw the breakpoint and current line indicators.
    public void paint(Graphics g) {
        g.setColor(Color.red);
        for (int i=0; i<br.length;i++) {
            if (br[i]) g.fillOval(1,10*i,9,9);
        }
        if (cur_line!=-1) {
            g.setColor(Color.yellow);
            Polygon p = new Polygon();
            p.addPoint(1,10*cur_line);
            p.addPoint(9,10*cur_line+5);
            p.addPoint(1,10*cur_line+9);
            g.fillPolygon(p);
        }
    }
    //minumumSize and preferedSize are called by the layout managers to automatically place a component.
    //we return 12,12 so that BorderLayout will let us have a column with 12 pixels.
    public Dimension minimumSize() {
        return new Dimension(12,12);
    }
    public Dimension preferredSize() {
        return new Dimension(12,12);
    }
//mouseDown is called when the user clicks with the mouse over an Component, if it returns false this event is passed to the container of the component.
public boolean mouseDown(Event evt, int x, int y) {
//Calculate the line and toggle the breakpoint
        int i = y/10;
        br[i] = ! br[i];
        //repaint is used to signal the need to refresh the GUI are of this component
        repaint();

        return true;
    }
    //This two methods are used to access the cur_line field.
    //Note that this way we can call repaint() when cur_line changes.
    public void setLine(int line) {
        cur_line=line;
        repaint();
    }
    public int getLine() {
        return cur_line;
    }
} //class SourceClicker
//SourceText manages the source text area of our applet, in an future version it should enable the change by the user of selected constants in the text.
class SourceText extends Canvas {
    //We use an (limited) 10 line array to store the source text
    String lines[] = new String[10];
    //The constructor just sets the white background
    public SourceText() {
        setBackground(Color.white);
    }
    //paint draws the lines in the GUI area
    public void paint(Graphics g) {
        for (int i=0;i<lines.length;i++) g.drawString(lines[i],0,10*i+10);
    }
    //setText gives access to array of source lines
    //the this keyword is used to differentiate the lines argument from the lines field in this class.
    //(we could have used a different name to the argument;-)
    public void setText(String[] lines) {
        this.lines = lines;
    }
} //class SourceText
//VarPanel manages the variables area in the applet, in an future version it should enable the change and selection by the user of any defined variable.
class VarPanel extends Canvas {
    //We use a simple 5 integer array in this version
    int vars[]=new int[5];

    //lastVar is used to signal in red the last changed variable
    int lastVar = -1;
//the rest of the code in this class is obvious
    public VarPanel() {
        setBackground(Color.white);
    }
    public void paint(Graphics g) {
        for (int i=0;i<vars.length;i++) {
            if (i!=lastVar)
                g.setColor(Color.black);
            else
                g.setColor(Color.red);
            g.drawString("Var "+i+":"+vars[i],0,10*i);
        }
    }
    public void changeVar(int varId, int newValue) {
        vars[varId]=newValue;
        lastVar=varId;
        repaint();
    }
    public int getVar(int varId) {
        return vars[varId];
    }
} //class VarPanel
//Finally our CustomClass1
//This class implements the CustomInterface so it can be used by our Applet.
//Please note that its possible to change the Applet so it can load *any* given class (even in runtime) that implements CustomInterface.
class CustomClass1 implements CustomInterface {
    //parent is our FrameworkInterface class
    FrameworkInterface parent=null;
    //setParent defines the FrameworkInterface class and initializes the source code (we could have done that part in an constructor)
    public void setParent(FrameworkInterface parent){
        this.parent = parent;
        //Create the "source code"
        String lines[]=new String[10];
        lines[0]="import java.util.*;";
        lines[1]="class Teste {";
        lines[2]=" int a=10, int b=20, c=0";
        lines[3]="";
        lines[4]=" public Teste() {";
        lines[5]=" a++;";
        lines[6]=" b=(new Date()).getSeconds();";
        lines[7]=" if (a>b) c=20;";
        lines[8]=" };";
        lines[9]="};";
        //Now we give our parent the source code...
        parent.setText(lines);
        //note: setParent could return the lines array, but in the future we may need more return paramenters so...
    }
    //executeLine is called by our parent to execute the code of one source line
    //we return the line number of the next line in code or -1 in the end of execution
    //we use the parent object to control variables (and in future versions to get access to screen, etc)
    public int executeLine(int line) {
        switch (line) {
        case -1: return 2;
        case 2: parent.changeVar(1,10);
                parent.changeVar(2,30);
                parent.changeVar(3,0);
                return 4;
        case 4: return 5;
        case 5: parent.changeVar(1,parent.getVar(1)+1);
                return 6;
        case 6: parent.changeVar(1,(new Date()).getSeconds());
                return 7;
        case 7: if (parent.getVar(1)>parent.getVar(2))
                    parent.changeVar(3,20);
                return 8;
        case 8: return -1;
        }
        return -1;
     }
} //class CustomClass1
//This interface defines the methods a Custom Class must implement
interface CustomInterface {
    public void setParent(FrameworkInterface parent);
    public int executeLine(int line);
} //interface CustomInterface
//This interface defines the methods a Framework must implement
interface FrameworkInterface {
    public void changeVar(int varId, int newValue);
    public int getVar(int varId);
    public void setText(String[] lines);
} //interface FrameworkInterface